Ago 21, 2013
The world’s leading gear manufacturers and their top suppliers are demanding greater system capability and utilization from their inspection systems. Just measuring gear geometry is no longer sufficient, now that accuracy requirements are at sub-micron levels, and other inspection criteria such as surface finish measurement and grind burn detection are becoming increasingly commonplace.
For Gleason, the solution is to simply expand the capabilities of our GMS® Series of Analytical Gear Inspection Systems. With the GMS Series, we already provide what high accuracy measurement systems require most: a stable, robust platform, able to position and control movement in both linear and rotational axes. As a result, new functions such as surface finish measurement, form measurement, grind burn detection and general prismatic (CMM) measurements are a natural extension of the GMS’ inspection capabilities.
The reality is that our ability to control motion, combined with our robust system for measuring the complex geometries of gear tooth forms, offers an elegant solution: a multi-purpose system that eliminates the expense of multiple machines that, take up valuable space, and add redundant fixturing, programming calibration and maintenance cost.
When a gear (or any rotationally symmetrical workpiece) is set up for measurement on a Gleason GMS inspection machine, it is convenient to test for other quality characteristics called out on most part prints today, such as surface roughness. Though our machines had this feature in the late 1990s, it was limited. Digital probing systems were still in their infancy, not as versatile and reliable as they are today, and while we sold quite a few systems, the integration was not as seamless as most had hoped.
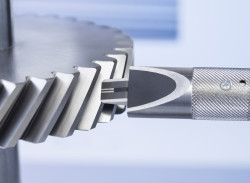
Fast forward to today’s motion control technology, systems integration techniques and capabilities, and market demand, and the picture of supporting the manufacturer’s needs becomes much clearer. Today’s systems utilize devices kinematically coupled to our motion control system, which allows the stylus to automatically:
- Rotate to the helix angle of the gear
- Move normal to the surface of the workpiece
- Deflect the probe at a constant force
- Gather data
- Determine roughness to whatever parameter required
Read the rest of the article here or download the PDF of the entire article at the link above to learn more.

